|

|
精度、稳定性和均匀性方面的参考水平性能
快速升温
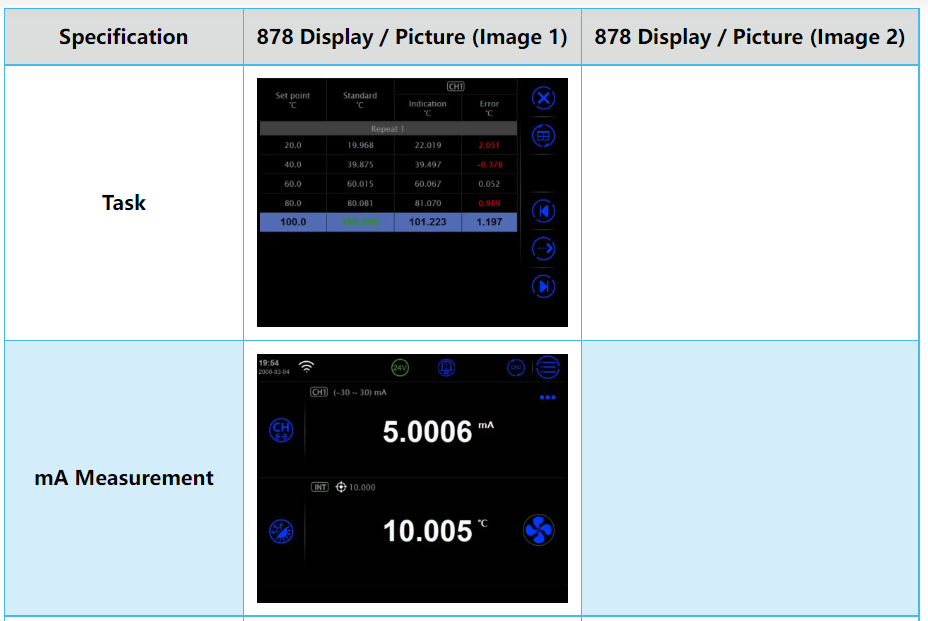
双通道读出测量RTD和TC,并提供任务文档
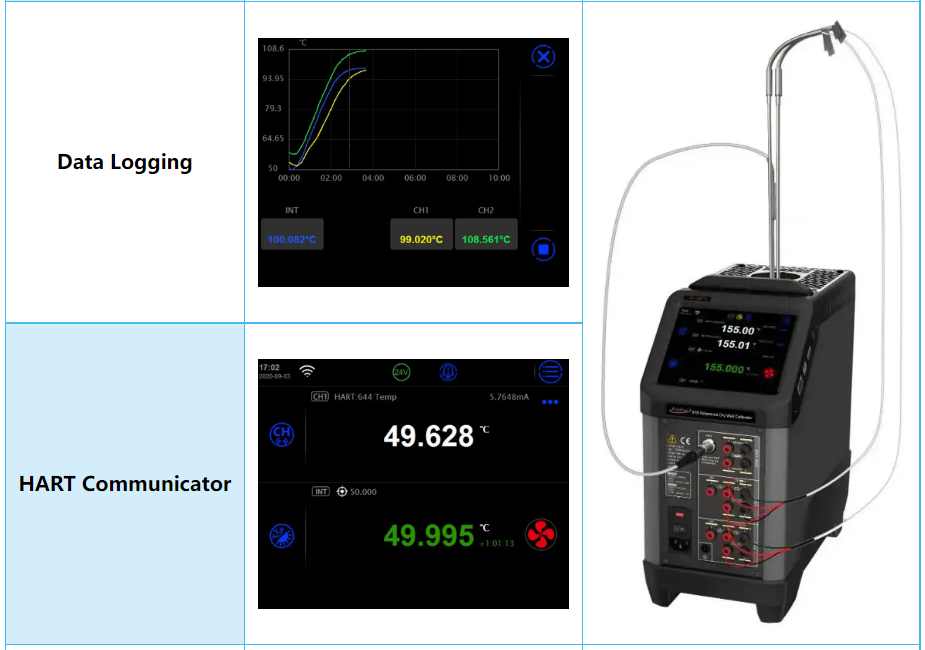
全HART通讯器(PC选项)
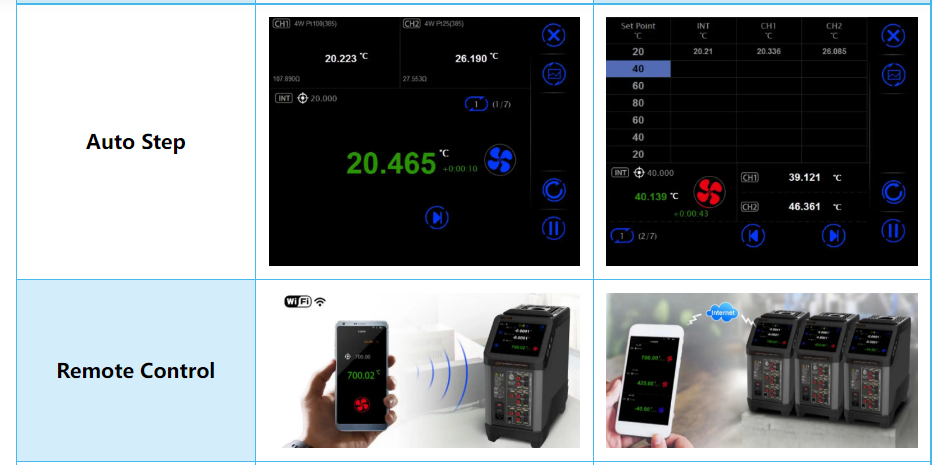
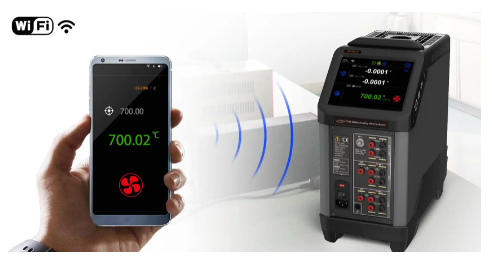
支持Wi-Fi和蓝牙
彩色触摸屏显示器
快速推入式连接器(电脑选项)
参考设定值控制
自校准功能
用于内置自动实现的可选TPW套件(仅限ADT878-160)
内置自动退火功能(仅限ADT878-700)
ISO 17025认证校准,包括数据 |
我们正在使用Additel 878干井校准器将温度校准提升到一个新的水平。如果你正在寻找市场上最好的干井,那就别再找了!ADT878系列充分体现了Additel对持续改进、质量和节省时间的承诺。有三种型号可供选择,范围从-40°C到700°C,您将找到最适合您校准需求的型号。过程校准器选项增加了一个外部参考输入、一个UUT的双通道读数以及一整套功能,以帮助完成从测量温度传感器到校准热电偶、自校准参考井和配置HART变送器的所有工作。每个单元都标配了一个大型触摸屏显示屏、双区域控制以及Additel对行业最佳客户服务的承诺。我们确信,这些改变游戏规则的参考干井的出色表现会让你大吃一惊!
过程校准器选项
每种型号都可以通过我们的过程校准器(PC)选项购买。该选项结合了功能齐全的HART记录过程校准器和参考级干井中的许多功能。该选项包括测量参考PRT的能力,几乎具有任何连接类型,以及两个可测量mA、电压、开关、RTD或热电偶的待测设备通道。除了这些测量功能外,该校准器还具有创建任务、保存发现和遗留结果以及与HARTsmart发射机通信的完整记录能力。过程校准器选项还有一个车载全HART通讯器,允许用户读取、配置和校准HART变送器。快照功能允许您只需按下按钮即可捕获屏幕上显示的所有信息。此可选插件允许在自动步进功能上记录所有通道的数据。使用参考PRT,您也可以使用内部传感器或外部参考PRT控制干井设定点。
自校准
我们相信使用外部参考探针作为标准是进行温度校准的最佳方式。但我们也认识到,这种方法并不总是必要或方便的,根据应用,使用内部控制传感器将是优选的。传统上,内部控制传感器具有广泛的精度,这在很大程度上是其长期漂移的原因。我们内置了自校准功能,允许您使用外部参考对内部控制传感器进行自动校准。只需进行少量选择,校准就会自动运行,为您提供控制传感器的全新、可追溯的校准,这将提高其准确性,因为在用作参考时,您不必考虑其长期漂移。
自动化功能
传统上,干井只是一种稳定的热源。为了提高我们的参考干井的可用性,我们增加了自动化功能,使您能够将这些令人惊叹的设备用作高度稳定的热源、三点水维护设备和退火炉。ADT878-160干井与ADT878-TPW-KIT相结合,可以自动实现和维护水电池的三相点。传统的方法需要时间和实践才能实现水的三相点。Additel现在通过一个自动TPW实现功能简化了这个过程。只需将试管和PRT插入参考干井并运行该程序。当电池过冷时,固件中的自动化将发出警报。取出细胞并摇晃它,现在你可以在参考井中保持三重点。这对于检查PRT的漂移非常有用。有关更多信息,请参阅我们的ADT878-TPW-KIT数据表。当您购买我们的700°C参考干井时,您会发现我们的自动退火功能用于退火PRT。我们有预先配置的退火程序,可以设置温度、退火时间和冷却速率。此功能还允许您创建自己的退火程序。
878-160具有-40°C至160°C的温度控制功能,全量程显示精度为±0.1°C。它还可以运行全自动的三点水(TPW)测试,以实现和维护TPW电池,该电池可用于检查探针随时间的漂移。
878-425具有33°C至425°C的温度控制功能,全量程显示精度为±0.2°C。
878-700具有从33°C到700°C的温度控制和高达±0.2°C的显示精度。它还具有用于退火PRT和减轻漂移的自动退火功能。此功能带有预配置的退火程序,但也允许用户创建的退火程序被重新配置


| Reference Dry Well Specifications |
| Specification |
878-160 |
878-425 |
878-700 |
| Temperature Range at 23°C |
-40°C to 160°C |
33°C to 425°C |
33°C to 700°C |
| Display Accuracy |
±0.1°C at Full Range |
±0.2°C at Full Range |
±0.20°C at 33°C |
| ±0.20°C at 425°C |
| ±0.25°C at 660°C |
| Stability (30 min) |
±0.005°C at Full Range |
±0.005°C at 100°C |
±0.005°C at 100°C |
| ±0.010°C at 225°C |
±0.015°C at 425°C |
| ±0.015°C at 425°C |
±0.030°C at 700°C |
| Axial Uniformity at 60 mm (2.4 in) |
±0.025°C at -40°C |
±0.10°C at 100°C |
±0.10°C at 100°C |
| ±0.020°C at 0°C |
±0.15°C at 225°C |
±0.25°C at 425°C |
| ±0.050°C at 160°C |
±0.25°C at 425°C |
±0.40°C at 700°C |
| Axial Uniformity at 80 mm (3.15 in) |
±0.050°C at -40°C |
±0.15°C at 100°C |
±0.15°C at 100°C |
| ±0.040°C at 0°C |
±0.20°C at 225°C |
±0.30°C at 425°C |
| ±0.050°C at 160°C |
±0.30°C at 425°C |
±0.60°C at 700°C |
| Radial Uniformity |
±0.01°C at Full Range |
±0.025°C at 100°C |
±0.025°C at 100°C |
| ±0.030°C at 225°C |
±0.040°C at 425°C |
| ±0.040°C at 425°C |
±0.060°C at 700°C |
| Loading Effect |
±0.08°C (Display Sensor) |
±0.05°C (Display Sensor) |
±0.02°C at 100°C |
| ±0.05°C at 425°C |
| ±0.15°C at 700°C |
| ±0.010°C (External Sensor) |
±0.01°C (External Sensor) |
±0.01°C at 100°C |
| ±0.02°C at 425°C |
| ±0.03°C at 700°C |
| Hysteresis (Display Sensor) |
0.025°C |
0.04°C |
0.07°C |
| Environmental Conditions |
8°C to 38°C guaranteed accuracy |
| 0°C to 50°C, 0% to 90% RH non-condensing |
| Storage Conditions |
-20°C to 60°C |
| IP Rating |
IP20 |
| Immersion Depth |
160 mm (6.30 in) |
193 mm (7.60 in) |
| Insert OD |
31.9 mm (1.26 in) |
30.8 mm (1.21 in) |
| Heating Time |
4 min: -40°C to 23°C |
15 min: 23°C to 425°C |
25 min: 23°C to 700°C |
| 10 min: 23°C to 160°C |
| Cooling Time |
8 min: 160°C to 23°C |
24 min: 425°C to 100°C |
30 min: 700°C to 100°C |
| 15 min: 23°C to -40°C |
15 min: 100°C to 50°C |
15 min: 100°C to 50°C |
| Typical Time to Stability |
10 min |
| Resolution |
0.001°C |
| Units |
°C, °F, and K |
| Display |
6.5 in (165 mm) color touch screen |
| Size (H x W x D) |
170 x 345 x 330 mm (6.69 x 13.58 x 13.0 in) |
| Weight |
11.2 kg (24.7 lbs) |
9.7 kg (21.4 lbs) |
| Power Requirements |
90-254 VAC, 45-65 Hz, 580 W |
90-25 VAC, 45-65 Hz, 1400 W |
| Communication |
USB A, USB B, RJ45, WiFi, Bluetooth |
| Localization |
English, Chinese, Japanese, Russian, German, French, Italian, and Spanish |
| Warranty |
1 year |
| Input Specifications (Process Calibrator [PC] Option) |
| Specification |
Description |
| Readout Accuracy for 100 ohm PRT (Probe Accuracy Not Included) |
±0.005°C at -40°C |
| ±0.006°C at 0°C |
| ±0.008°C at 50°C |
| ±0.009°C at 100°C |
| ±0.011°C at 160°C |
| ±0.015°C at 300°C |
| ±0.019°C at 425°C |
| ±0.026°C at 660°C |
| ±0.028°C at 700°C |
| Readout Resolution |
0.1 mΩ |
| Reference Resistance Temperature Measurement Range |
-200°C to 926°C |
| Reference Resistance Accuracy |
0Ω to 50Ω: ±1.25mΩ |
| 50Ω to 400Ω: ±0.0025% RD |
| Reference Characterizations |
ITS-90, CVD, IEC-751 |
| Reference Measurement Capability |
4-wire PRT |
| Reference Probe Connection |
6-pin lemo smart connector and Quick-Push connectors to accept banana, mini-banana, large & small spade lug and bare wire connections |
| RTD Channels |
2 channels. Both accept 2, 3, or 4-wire RTDs |
| RTD Measurement Accuracy (excl sensor) |
0Ω - 25Ω: ±0.002Ω |
| 25Ω - 400Ω: 0.004% RD |
| 400Ω - 4kΩ: 0.005% RD |
| RTD Measurement Resolution |
0.1mΩ |
| RTD Measurement Resistance Range |
0Ω to 4KΩ |
| RTD Characterizations |
PT10, PT25, PT50, PT100, PT200, PT500, PT1000, CU10, CU50, CU100, NI100, NI120 |
| RTD Connection |
Quick-Push connectors accept banana, mini-banana, large & small spade lug and bare wire connections. |
| TC Channel |
2 |
| TC Measurement Channels |
Accepting S, R, K, B, N, E, J, T, C, D, G, L, and U |
| TC Range |
-75 mV to 75 mV |
| TC Resolution |
0.1µV |
| TC Voltage Accuracy |
0.01% RD + 5 µV |
| Internal CJC Accuracy |
±0.2°C (ambient from 0°C to 50°C) |
| Current Range |
-30 mA to 30 mA |
| Current Accuracy |
0.01% RD + 2 µA |
| Current Resolution |
0.1 µA, Input Impedance: < 10Ω |
| Voltage Range |
-12 V to 12 V and –30 V to 30 V |
| Voltage Accuracy |
±0.01% RD + 0.6 mV |
| Voltage Resolution |
0.1 mV; Input impedance: >1MΩ |
| Switch Test |
Mechanical or Electrical |
| DC 24V Output |
24 V ±0.5 V, MAX 60 mA |
| Hart Communicator |
Read, configure and calibrate HART devices - DD files updated periodically. Optional - (order ADT875PC) |
| Documentation |
Up to 1,000 tasks which store up to 10 results each containing as found and as left data. Snap shot feature allows for screen captures. Records auto step and ramp functions. |
| Temperature Coefficient (0°C to 13°C and 33°C to 50°C) |
ADT878 (PC)-160: ±0.005°C/°C |
| ADT878 (PC)-425/700: ±0.005°C/°C |
| Ref Readout: ±1 ppm FS/°C |
| RTD Readouts: ±1 ppm FS/°C |
| TC Readouts: ±5 ppm FS/°C |
| Current: ±5 ppm FS/°C |
| Voltage: ±5 ppm FS/°C |
| TC Measurement Specification and Calculation (Process Calibrator [PC] Option) |
| TC Type |
Temperature (°C) |
Error (°C)[1] |
| B |
250 |
±1.99 |
|
300 |
±1.65 |
|
425 |
±1.18 |
|
660 |
±0.81 |
|
700 |
±0.77 |
|
1768 |
±0.56 |
| K |
-200 |
±0.29 |
|
-40 |
±0.13 |
|
0 |
±0.13 |
|
160 |
±0.14 |
|
300 |
±0.15 |
|
425 |
±0.16 |
|
660 |
±0.18 |
|
700 |
±0.19 |
|
1000 |
±0.31 |
| E |
-200 |
±0.16 |
|
-40 |
±0.09 |
|
0 |
±0.09 |
|
160 |
±0.08 |
|
300 |
±0.09 |
|
425 |
±0.10 |
|
660 |
±0.12 |
|
700 |
±0.13 |
|
1000 |
±0.17 |
| J |
-210 |
±0.22 |
|
-40 |
±0.10 |
|
0 |
±0.10 |
|
160 |
±0.11 |
|
300 |
±0.12 |
|
425 |
±0.13 |
|
660 |
±0.14 |
|
700 |
±0.14 |
|
1000 |
±0.21 |
| T |
-200 |
±0.28 |
|
-40 |
±0.14 |
|
0 |
±0.13 |
|
160 |
±0.11 |
|
300 |
±0.11 |
|
400 |
±0.11 |
| N |
-200 |
±0.46 |
|
-40 |
±0.20 |
|
0 |
±0.19 |
|
160 |
±0.17 |
|
300 |
±0.17 |
|
425 |
±0.17 |
|
660 |
±0.19 |
|
700 |
±0.19 |
|
1000 |
±0.27 |
| S |
-50 |
±1.25 |
|
-40 |
±1.17 |
|
0 |
±0.93 |
|
160 |
±0.63 |
|
300 |
±0.57 |
|
425 |
±0.55 |
|
660 |
±0.54 |
|
700 |
±0.53 |
|
1768 |
±0.66 |
| R |
-50 |
±1.33 |
|
-40 |
±1.23 |
|
0 |
±0.95 |
|
160 |
±0.61 |
|
300 |
±0.54 |
|
425 |
±0.51 |
|
660 |
±0.48 |
|
700 |
±0.48 |
|
1768 |
±0.58 |
| [1] Excluding cold junction compensation errors. |
| Secondary PRT Information |
| Specification |
AM1710 Series |
AM1730 Series |
AM1751 Series |
AM1760 Series |
| Temperature Range [3] |
-60°C to 160°C |
-200°C to 420°C |
-200°C to 670°C |
-200°C to 670°C |
| Resistance at 0°C |
Nominal 100Ω |
| Temperature Coefficient |
0.003925 Ω / Ω / °C |
| Calibrated Accuracy (k=2)[2][3] |
±0.025°C at -40°C |
±0.025°C at -40°C |
±0.025°C at -40°C |
±0.010°C at -196°C |
| ±0.015°C at 0.01°C |
±0.015°C at 0.01°C |
±0.015°C at 0.01°C |
±0.006°C at 0.01°C |
| ±0.025°C at 160°C |
±0.035°C at 420°C |
±0.035°C at 420°C |
±0.015°C at 420°C |
|
|
±0.05°C at 661°C |
±0.025°C at 661°C |
| Drift |
±0.01°C at TPW after 100 hours at 160°C |
±0.01°C at TPW after 100 hours at 420°C |
±0.01°C at TPW after 100 hours at 661°C |
±0.004°C at TPW after 100 hours at 661°C |
| Short Term Stability |
±0.007°C |
±0.002°C |
| Thermal Shock |
±0.005°C after (10) thermal cycles from minimum to maximum temperatures |
±0.002°C after (10) thermal cycles from minimum to maximum temperatures |
| Hysteresis |
<=0.005°C |
<=0.001°C |
| Self-heating |
50 mW/°C |
0.0015°C at 0.5mA |
| Response Time |
9 seconds for 63% response to step change in water moving at 3 feet per second |
| Measurement Current |
0.5 mA or 1 mA |
| Sensor Length |
32 mm |
42 mm |
| Sensor Location |
5 mm from tip |
| Insulation Resistance |
>1000 MΩ at room temperature |
| Sheath Material |
Stainless Steel |
Inconeltm |
| Dimension |
AM1710-12-ADT |
AM1730-12-ADT |
AM1751-12-ADT |
AM1760-12-ADT |
| 0.25 in dia X 12 in (6.35 mm X 305 mm) |
0.25 in dia X 12 in (6.35 mm X 305 mm) |
0.25 in dia X 12 in (6.35 mm X 305 mm) |
0.25 in dia X 12 in (6.35 mm X 305 mm) |
| AM1710-BEND-ADT |
AM1730-BEND-ADT |
AM1751-BEND-ADT |
AM1760-BEND-ADT |
| 0.25 in dia X 12 in (6.35 mm X 305 mm), 90° bend at 7.4 inch (190 mm) from probe end |
0.25 in dia X 12 in (6.35 mm X 305 mm), 90° bend at 9.6 inch (245 mm) from probe end |
0.25 in dia X 12 in (6.35 mm X 305 mm), 90° bend at 9.6 inch (245 mm) from probe end |
0.25 in dia X 12 in (6.35 mm X 305 mm), 90° bend at 9.6 inch (245 mm) from probe end |
| External Leads |
Teflon™–insulated copper wire, 4 leads, 0.8 meters |
| Handle Dimension |
15 mm (OD) x 65 mm (L) |
| Handle Temperature Range[1] |
-50°C to 160°C |
-50°C to 180°C |
| Calibration |
NIST traceable calibration with data included. Accredited calibration available per request. |
| [1] Handle temperatures outside this range will cause damage to the probe. |
| [2] Includes calibration and 100 hour drift. |
| [3] Probe calibration ranges may differ from probe temperature ranges (see Calibrated Accuracy for calibration ranges). |
| *PRT Information from www.accumac.com |
| Specifications |
| Specification |
Display |
| Uncertainty |
<0.0005°C [1] |
| Immersion depth/ID |
115 mm X 8 mm |
| External Dimensions |
160 mm X 25 mm |
| Cell material |
Borosilicate Glass |
| Realization time |
20 mins |
| Estimated working time |
2 hours |
| Recommended thermal Fluid |
Ethanol |
| Warranty |
1 year |
| Secondary PRT Information |
| Specification |
AM1710 Series |
AM1730 Series |
AM1751 Series |
AM1760 Series |
| Temperature Range [3] |
-60°C to 160°C |
-200°C to 420°C |
-200°C to 670°C |
-200°C to 670°C |
| Resistance at 0°C |
Nominal 100Ω |
| Temperature Coefficient |
0.003925 Ω / Ω / °C |
| Calibrated Accuracy (k=2)[2][3] |
±0.025°C at -40°C |
±0.025°C at -40°C |
±0.025°C at -40°C |
±0.010°C at -196°C |
| ±0.015°C at 0.01°C |
±0.015°C at 0.01°C |
±0.015°C at 0.01°C |
±0.006°C at 0.01°C |
| ±0.025°C at 160°C |
±0.035°C at 420°C |
±0.035°C at 420°C |
±0.015°C at 420°C |
|
|
±0.05°C at 661°C |
±0.025°C at 661°C |
| Drift |
±0.01°C at TPW after 100 hours at 160°C |
±0.01°C at TPW after 100 hours at 420°C |
±0.01°C at TPW after 100 hours at 661°C |
±0.004°C at TPW after 100 hours at 661°C |
| Short Term Stability |
±0.007°C |
±0.002°C |
| Thermal Shock |
±0.005°C after (10) thermal cycles from minimum to maximum temperatures |
±0.002°C after (10) thermal cycles from minimum to maximum temperatures |
| Hysteresis |
<=0.005°C |
<=0.001°C |
| Self-heating |
50 mW/°C |
0.0015°C at 0.5mA |
| Response Time |
9 seconds for 63% response to step change in water moving at 3 feet per second |
| Measurement Current |
0.5 mA or 1 mA |
| Sensor Length |
32 mm |
42 mm |
| Sensor Location |
5 mm from tip |
| Insulation Resistance |
>1000 MΩ at room temperature |
| Sheath Material |
Stainless Steel |
Inconeltm |
| Dimension |
AM1710-12-ADT |
AM1730-12-ADT |
AM1751-12-ADT |
AM1760-12-ADT |
| 0.25 in dia X 12 in (6.35 mm X 305 mm) |
0.25 in dia X 12 in (6.35 mm X 305 mm) |
0.25 in dia X 12 in (6.35 mm X 305 mm) |
0.25 in dia X 12 in (6.35 mm X 305 mm) |
| AM1710-BEND-ADT |
AM1730-BEND-ADT |
AM1751-BEND-ADT |
AM1760-BEND-ADT |
| 0.25 in dia X 12 in (6.35 mm X 305 mm), 90° bend at 7.4 inch (190 mm) from probe end |
0.25 in dia X 12 in (6.35 mm X 305 mm), 90° bend at 9.6 inch (245 mm) from probe end |
0.25 in dia X 12 in (6.35 mm X 305 mm), 90° bend at 9.6 inch (245 mm) from probe end |
0.25 in dia X 12 in (6.35 mm X 305 mm), 90° bend at 9.6 inch (245 mm) from probe end |
| External Leads |
Teflontm –insulated copper wire, 4 leads, 0.8 meters |
| Handle Dimension |
15 mm (OD) x 65 mm (L) |
| Handle Temperature Range[1] |
-50°C to 160°C |
-50°C to 180°C |
| Calibration |
NIST traceable calibration with data included. Accredited calibration available per request. |
| [1] Handle temperatures outside this range will cause damage to the probe. |
| [2] Includes calibration and 100 hour drift. |
| [3] Probe calibration ranges may differ from probe temperature ranges (see Calibrated Accuracy for calibration ranges). |
| *PRT Information from www.accumac.com |
| AM1612-ADT Secondary PRT Specifications |
| Temperature Range |
-40°C to 160 °C |
| Resistance at 0 °C |
Nominal 100 Ω |
| Temperature Coefficient |
0.00385Ω/Ω /°C |
| Accuracy |
±0.05°C at 0°C |
| Drift |
±0.04°C at 0°C after 100 hours at 160°C |
| Short Term Stability |
±0.02°C |
| Thermal Shock |
±0.02°C after 10 times thermal cycles from minimum to maximum temperatures |
| Hysteresis |
<= 0.01°C |
| Self-heating |
75 mW/°C |
| Response Time |
4 seconds for 63% response to step change in water moving at 3 feet per second |
| Measurement Current |
1 mA |
| Internal Sensor Length |
0.49" (15 mm) |
| Dimension |
0.118" X 0.984" (3mm X 25mm) |
| Insulation Resistance |
>1000 MΩ at room temperature |
| Sheath Material |
Stainless Steel 316 L |
| Dimension |
0.118 inch X 1.78 inch ( 3 mm X 45 mm ) |
| External Leads |
Enameled copper wire protected by high temperature heat shrink tubing, 4 leads, 0.8 meters |
| Calibration |
NIST traceable calibration with data provided |
| Triple Point of Water Specifications |
| Specification |
Display |
| Uncertainty |
<0.0005°C [1] |
| Immersion depth/ID |
115 mm X 8 mm |
| External Dimensions |
160 mm X 25 mm |
| Cell material |
Borosilicate Glass |
| Realization time |
20 mins |
| Estimated working time |
2 hours |
| Recommended thermal Fluid |
Ethanol |
| Warranty |
1 year |
询价采购Additel 878干井校准器
请用微信扫描下方二维码或手动添加微信号2351992198
